Monday, 30 November 2015

'Piment'

‘Piment’ is dinner table staple in Gabon. It’s a fiery puree of minced chillies in oil, served as a condiment and usually smothered over meat. Traditionally, out in the villages where there’s no electricity, people store minced chillies in bottles of lemon juice which acts as a preservative, or they use small amounts of peanut or palm oil, and then use it up within a few days.

You can buy it in any market, but the best kinds are found in people’s homes. Usually it’s made with red chillies and their seeds and is blisteringly hot. A milder version uses green or yellow chillies with onion and garlic. Some people use olive oil, as I have here.


My version is generally considered rather woosey for your average Gabonese, as it is made with green chillies, quite a lot of onion and garlic, and I’ve removed the seeds. Keep the seeds in if you want to jack it up a notch, and reduce the onion if you think you're hard enough. The advantage of this recipe is it has lots of flavour that you can enjoy without fear of losing several layers of mouth lining in the process.
This makes about 400mls. A word of advice- wear rubber gloves if you want to avoid your hands feeling like they’ve been placed in battery acid for 3 hours.


Ingredients
8-10 green chillies
1 onion
3 cloves garlic
1/2 cup olive oil.

Instructions
  1. Wash the chillies well and remove stalks and seeds.
  2. Peel and roughly chop the onion, and peel the garlic.
  3. Place all ingredients with some of the oil into a blender, and whizz for just a few seconds so everything is finely minced, but still has some solid form, i.e. not too pureed and pastey.
  4. The onion will have released quite a lot of liquid, so scrape all the mixture into a frying pan, add the rest of the oil and sauté for 5 mins on medium heat to gently cook the mixture until all the moisture has gone.
  5. Let cool and transfer to a clean jar. Stir in more oil if required.

Thursday, 19 November 2015

Passion-fruit curd

An advantage of living in the tropics is that you can plant a seedling and watch it grow to reclaim an entire urban space back to nature in exponential time. I find that quite a comforting thought! We planted the seeds of one passion fruit and in a few months it had invaded the whole of our garden including the trees, the roof and the building next door.
Now it is tamed (with considerable effort, mind you), and in the height of the rainy season we can get 10-15 fruits off it a day! I have two favourite passion fruit recipes, this one and passion fruit sorbet. This is my simplified curd recipe which is a hybrid of Nigella Lawson's and BBC Good Food, and seems to be a big hit with my Gabonese lady friends. This makes about 2 small (200-250ml) jars worth.


Ingredients
About 200-220g passion fruit pulp (about 6-8 passion fruits)
3 eggs
100g unsalted butter
150g white sugar

Instructions
1. Beat the eggs and sugar together in a bowl.
2. Melt the butter slowly in a saucepan.
3. Whizz the passion fruit pulp in a food processor for about 4-5 seconds to separate the seeds from the pulp.
4. When the butter has melted, on a low heat use a sieve to strain the juice and as much pulp as possible into the butter. Stir, and keep the seeds to one side.
5. Add the egg/sugar mixture, and stir continuously over a low heat with a wooden spoon until it's thickened and creamy.
6. Optional step: stir in about 2 tbsp seeds,
7. Let cool for a few mins and pour into sterile jars. Keep in fridge.

Wednesday, 18 November 2015

DIY Doll's house fridge-freezer

Here's a doll's house fridge-freezer made from a biscuit box, some foam card and a few other bits and pieces.  


Instructions

First I took a biscuit box and cut it down to make two smaller boxes of the same size, with extra length to make flaps so I could close the boxes.


I lined the insides with foam card (apart from the front where I wanted the door to be), then glued the flaps shut.


I cut doors out of the front, then glued the two compartments together. Then I covered the outside with white foam card.


Next I traced and cut door frames from a piece of white card, and glued them onto the frames of the doors.


I also cut pieces of panelling for the inside and outside of each door from white foam card, which were slightly larger than the door itself. Once all glued in place, I trimmed them all down to size so that the doors were very slightly smaller than the frames and were able to close shut.


Next I made door handles from pieces of straw covered with the discarded silver wrapper from the biscuits that were inside the box! I glued the wrapper in place, and stuck silver star stickers onto the ends to seal the handles shut. 


I glued the handles in place on the doors, and cut a strip of coloured card and glued round the middle to cover the joints.


Finally I made shelving out of some corrugated plastic from a vegetable container, and I made a door shelf and vegetable tray from some moulded plastic from the inner packaging of a box of something (possibly a phone or modem) I'd kept by. 


And put it all together. All the shelves are glued in place, apart from the vegetable tray which is removeable. Voila!


Saturday, 14 November 2015

Panzerotti

Panzerotti are like deep fried mini calzones and have to be among the most delicious food items on the planet. They come from southern Italy and are typical street snacks of the Apuglia region. My grandmother came from Molfetta and I will never forget the culinary epiphany I had when I first tried them as an eight-year old fresh from 1970's England.


I'm sure my Italian relatives will have plenty to say about my sacrilegious English version, but this is how I do them. This recipe makes 16 small panzerotti which are good for pre-dinner snacks.

Ingredients
For the bread:
225g strong white bread flour
140mls milk/water mixture
1 tbsp olive oil
1/2 tsp salt
1/2 tsp sugar
1 tsp instant yeast granules

For the filling:
1 tin canned tomatoes
1/2 onion, diced finely
basil
salt
1 tsp sugar
olive oil
1 mozzarella, cubed

Instructions
1. Make dough either by hand (mixing all ingredients and kneading for 10 mins), or in a bread-maker on the dough setting. Let rise until doubled in size.


2. To make the sauce: saute the onion in olive oil until soft, add tomatoes and seasoning (basil, salt, sugar), stir and simmer until thick and cooked (about 15-20 mins). Leave to cool.


3. Roll dough into a sausage about 40 cm long. Cut into 16 pieces of equal size. If you want to be scientific about it, each piece should weigh between 20-25 g.


4. Roll out one piece to a circle about 10cm diameter. Keep the other pieces under a tea-towel.


5. Add a heaped teaspoon of cooled tomato mixture into the centre of the dough circle and add a couple of pieces of cheese. Do not be tempted to overfill, otherwise they burst during cooking.


6. Pat the edges of the dough with a dampened finger, fold over and seal the edges thoroughly. Crimp with your finger.


7. Heat the oil until it's frying temperature. Add the panzerotti as soon as it's made to the hot oil. Fry for 30 secs -1 minute on each side until puffed and golden.


8. Place on kitchen roll to drain excess oil. Cover with tea-towel until ready to serve.


Notes for frying:

a) Do not pre-make a whole batch and let them sit, as the tomato sauce will seep through and make the dough soggy. Make each one and fry individually.

b) Check and reduce the oil temperature during frying, as the oil will get very hot and start cooking them too fast. Keep the oil hot but on low-medium heat once it's reached temperature.

c) Watch each panzerotti closely during frying as they tend to 'float' on one side and can easily burn on one side. Use a utensil to force them over and fry on the other side.


Pesto without pine-nuts!

This is my economic version of pesto that uses almonds instead of pine nuts - it much cheaper to make and tastes just as good! These quantities will make about 300mls of pesto and should take you about 5 minutes to make.


Ingredients
50g almonds (flaked, whole or ground)
5 cloves of garlic
50g frozen chopped basil
50g frozen chopped parsley
25g parmesan cheese
65g olive oil
juice of half a lemon
salt and pepper to taste

To make: put all the ingredients into a blender and whizz for about 20-30 seconds. Season and adjust quantities to taste.


Thursday, 12 November 2015

Cardboard box doll's house

Kids toys are pretty expensive in Gabon, so I'm turning into a bit of a bag lady, stockpiling household rubbish in the hope of making all kinds of inspirational recycled toys.
This was my first efforts at turning cardboard box into a dolls house. The box came from a garden swimming pool and was about 1m high. I just cut the thing in half lengthways, and cut up the discarded half to make the floors and roof. I covered it with a load of patterned paper I'd bought and also some photos from magazines. It's not finished yet, btw.


Wednesday, 11 November 2015

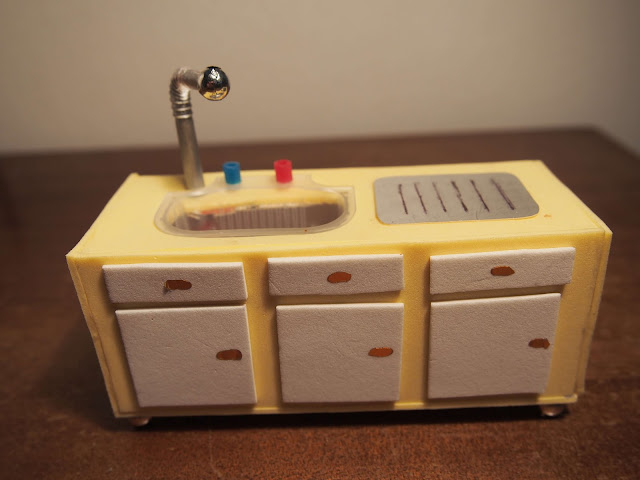
DIY doll's house sink unit

I got inspiration from a few websites (e.g. http://www.mnn.com/family/family-activities/blogs/diy-recycled-doll-house-furniture). 


To make this version I used:

Material
1 box from a bottle of medicine
1 plastic razor-head cover
1 plastic bendy straw
1 sheet of pale yellow foam card
1/2 sheet of white foam card
5 small round silver beads
1 small red bead
1 small blue bead
1 blue sequin
2 gold flower stickers
1 piece of silver metallic card
White and metallic silver acrylic paint (or you could use tin foil or foil wrapper)
Glue
Black biro or fine marker pen

Instructions
  1. Glue open end of the box shut. Decide where the sink should go, and trace the outline of the sink hole around the bottom of the razor head cover.
  2. Using a scalpel, cut a hole out of the box for the sink, and adjust the hole size just enough so the razor head cover fits inside to form a sink. Remove the sink for later.
  3. Cut 6 pieces of coloured foam to fit around the six sides of the unit and glue in place, making sure they line up exactly at the edges.
  4. Using a scalpel, cut a hole through the foam sheet around the sink hole – making sure the foam is just very slightly overlapping the cardboard underneath.
  5. Push the sink snugly into place.
  6. Cut a piece of silver card fit into the bottom of the sink and glue in place. Stick a blue sequin or button on as a plug hole.
  7. Cut a piece of silver card to make a draining board and use a fine marker pen or black biro to draw on the corrugated lines. Glue in place.
  8. Cut a piece of bendy straw the right length for the faucet, making sure it’s long enough to touch the floor of the sink unit when in place. Either paint it with acrylic paint (3 coats white + 3 coats metallic silver) or cover with silver foil (glue in place).  Glue a silver bead onto the end.
  9. Cut a small hole next to the sink in the place you want the faucet to go, and push the faucet through the hole until it reaches the floor of the sink unit.
  10. Glue the red and blue beads in place as taps.
  11. Cut 3 squares and 3 small rectangles of white (or coloured) foam card to make drawers and cupboard doors, and glue in place.
  12. Cut six tiny lozenges from the petals of gold flower stickers and stick onto drawers and cupboards as handles.
  13. Glue four silver beads onto the base as feet.

Tuesday, 10 November 2015

Bird puppet toilet roll craft

I got the idea from this site: http://www.redtedart.com/2010/07/21/fall-crafts-leaf-marionette-birds/. Good value toddler craft.


Material
1 kitchen roll cardboard tube (or 2 toilet roll tubes)
a piece of yellow card
some string
a few coloured feathers
2 googly eyes
cotton wool
2 large beads
2 small rocks or something similarly weighty and non-degradable
a piece of newspaper
a stick
poster paint
glue

Instructions
  1. Cut two pieces of toilet roll one slightly bigger than the other- one for the head and one for the body.
  2. Get a child to paint them bright colours and stick googly eyes on the smaller piece.
  3. Cut a yellow cone shape to fit the head and glue or tape into place.
  4. Pierce 2 holes in the top of the body cavity about 2cm from each end, and thread some knotted string through.
  5. Pierce 2 holes in the bottom centre of the body cavity  about 3cm apart, and thread some knotted string through. Thread the other ends through 2 beads, cut to desired size to make legs and knot in place.
  6. Pierce 1 hole in the bottom of the head (for the neck), about 1/3 from back, and another in the top of head, a little closer to the back than the neck. 
  7. Attach the body to the head with the piece of string at the front of the body, and knot in place.
  8. Thread a piece of knotted string into the hole in the top of the head. Tie to the stick. 
  9. Tie the string at the back of the body onto the stick. Adjust the string lengths so the puppet hangs well.
  10. Place two small rocks inside the body cavity as weights- hold in place with screwed up newspaper and some glue, then get child to glue balls of cotton wool to close both ends, as well as the back of the head.
  11. Get child to decorate the puppet by gluing feathers on for wings and tail.